

Set Up and Send WhatsApp Messages with WhatsApp Cloud API
Libwana.net provides WhatsApp Cloud API integration to help businesses connect their WhatsApp Business Account and manage WhatsApp messaging directly from the Libwana.net platform.
After completing the setup, users can access the Messages section to send WhatsApp messages to a single recipient, groups, or contacts imported through a file.
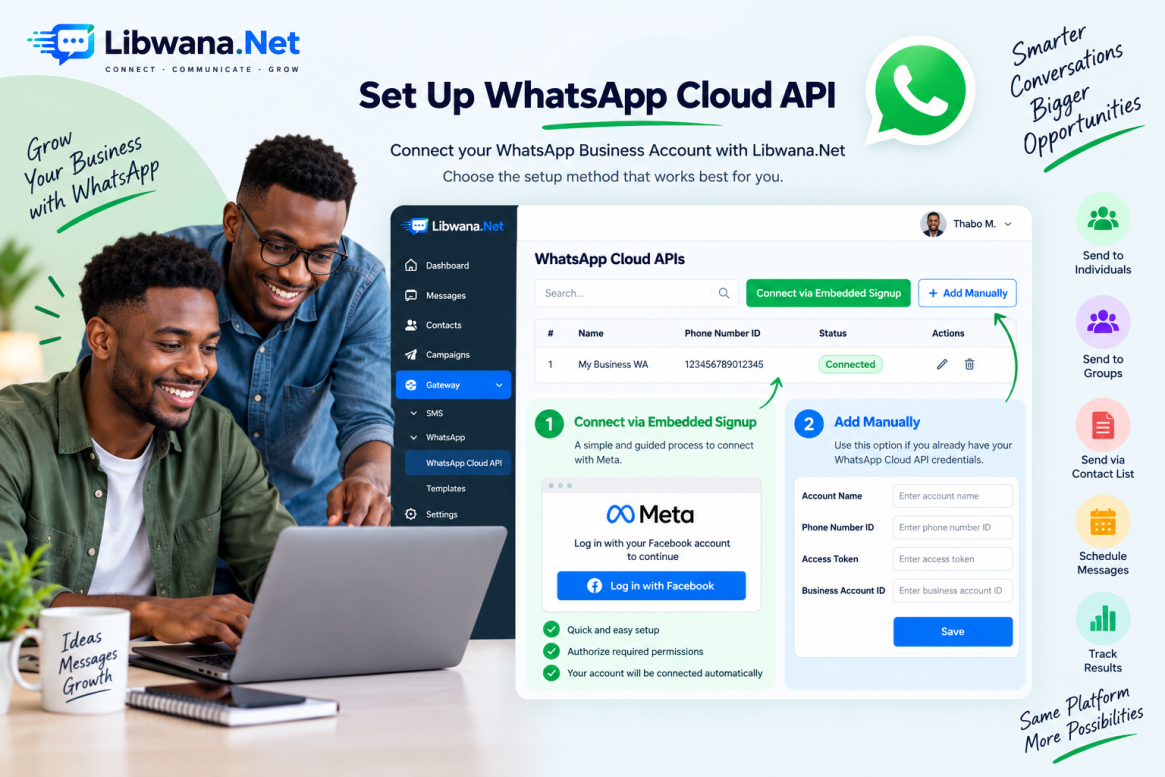
Libwana.net provides two methods for connecting a WhatsApp Business Account:
Embedded Signup and Manual Setup.
For users who already have their WhatsApp Cloud API credentials, Add Manually is the preferred setup method.
Step 1: Open WhatsApp Cloud API Gateway
Log in to your Libwana.net account and navigate to:
Gateway → WhatsApp → WhatsApp Cloud API
The WhatsApp Cloud API page displays your configured WhatsApp Business Accounts and provides the options required to connect and manage them.
You will find two setup options:
- Connect via Embedded Signup
- Add Manually
You can choose either method depending on how your WhatsApp Business Account is configured.
Step 2: Option 1 – Connect via Embedded Signup
The Embedded Signup option provides a guided Meta connection process.
Click:
Connect via Embedded Signup
A Meta/Facebook login window will open.
Log in using the Facebook/Meta account associated with the business that you want to connect.
Follow the instructions provided by Meta to select or configure the appropriate business and WhatsApp Business resources and authorize the required permissions.
After successfully completing the Meta setup, return to Libwana.net.
Your connected WhatsApp Business Account should then appear in the WhatsApp Cloud APIs section.
Step 3: Option 2 – Add WhatsApp Business Account Manually
If you already have your WhatsApp Cloud API credentials, we recommend using the Add Manually option.
Click:
+ Add Manually
The Add WhatsApp Business Account Manually form will appear.
Complete all the required fields.
Business Portfolio Name
Enter a recognizable name for your WhatsApp Business configuration.
For example:
Libwana Business
This name will help you identify the account when sending WhatsApp messages.
Per Message Minimum Delay (Seconds)
Specify the minimum delay between messages.
Example:
5 seconds
Per Message Maximum Delay (Seconds)
Specify the maximum delay between messages.
Example:
5 seconds
Delay After Count
Specify how many messages should be processed before an additional delay is applied.
Example:
50 messages
Delay After Duration (Seconds)
Specify how long the system should pause after reaching the configured message count.
Example:
5 seconds
Reset After Count
Specify the message count after which the configured sending cycle should reset.
Example:
200 messages
These values can be configured according to your messaging requirements and applicable WhatsApp/Meta policies.
Step 4: Enter Your WhatsApp Cloud API Credentials
The manual setup also requires your WhatsApp Cloud API credentials.
User Access Token
Enter the valid User Access Token associated with your WhatsApp Business configuration.
Your access token is sensitive information. Never publish or share it publicly.
Phone Number ID
Enter the Phone Number ID associated with the WhatsApp Business phone number.
The Phone Number ID is different from the actual phone number, so make sure the correct ID is entered.
WhatsApp Business Account ID
Enter the WhatsApp Business Account ID, also known as the WABA ID, associated with your account.
Once all required information has been entered, click:
Save
Your WhatsApp Business Account will now be added to the WhatsApp Cloud API section of Libwana.net.
Step 5: Manage Your WhatsApp Cloud API Account
After successfully adding your WhatsApp Business Account, it appears in the WhatsApp Cloud APIs list.
From here, you can manage your connected account using the available actions.
Depending on the available configuration, you can update the account details, synchronize information and templates, manage the connection, or delete an account that is no longer required.
Step 6: Configure the WhatsApp Webhook
After setting up your WhatsApp Cloud API account, you can also configure a webhook.
Click:
Configure Webhook
Libwana.net provides the required:
Callback URL
Verify Token
Use these details when configuring the corresponding webhook in your Meta WhatsApp Business setup.
The webhook allows supported WhatsApp events and updates to be delivered to the configured Libwana.net endpoint.
Keep your webhook verification information secure and avoid sharing it publicly.
Step 7: Manage WhatsApp Templates
After your WhatsApp Business Account is connected, you can use the WhatsApp templates available for your account.
Libwana.net may provide templates that have already been made available to you by the platform administrator.
You can also create and manage your own templates through the Templates section available in the left-side navigation menu.
Navigate to:
Templates → WhatsApp Templates
Create the required template and complete the available approval or synchronization process.
WhatsApp templates must comply with applicable Meta and WhatsApp Business requirements.
After new templates are added or updated, use the available synchronization functionality where required to make the latest templates available to your connected WhatsApp Business Account.
Step 8: Send WhatsApp Messages from the Messages Section
Once your WhatsApp Cloud API setup is complete, navigate to:
Messages → WhatsApp → Send Message
This is where you can send WhatsApp messages using your configured gateway.
The Send WhatsApp page provides multiple audience options.
Single Audience
Choose Single Audience when you want to send a WhatsApp message to one recipient.
Enter the recipient's WhatsApp phone number in the Phone Number field.
Make sure the phone number is entered in the format expected by the platform.
Group Audience
Choose Group Audience when you want to send messages using an available contact group instead of entering recipients individually.
Import File
For larger recipient lists, use the Import File option.
This allows you to import supported recipient data and use it for larger messaging operations without manually entering every phone number.
This makes Libwana.net suitable for both individual and larger-scale WhatsApp communication workflows, subject to WhatsApp messaging rules and recipient consent requirements.
Step 9: Send Immediately or Schedule Your Message
Libwana.net also provides a Schedule At option.
Use:
Choose Date & Time
to select when you want the WhatsApp message to be processed.
This is useful when preparing communications in advance or scheduling messages for a specific date and time.
If scheduling is not required, proceed with the normal sending workflow available on the page.
Step 10: Select Cloud API as the Sending Method
Under Sending Method, open Choose Method and select:
Cloud API
Once Cloud API is selected, Libwana.net displays another field:
Choose Business Account from the list
Select the WhatsApp Business Account that you previously configured.
For example:
Libwana Business
If multiple WhatsApp Business Accounts are configured, select the appropriate account for the message you are preparing.
Step 11: Select a WhatsApp Template
When using the WhatsApp Cloud API flow, select the appropriate WhatsApp template under:
Select WhatsApp Templates → Choose Template
The available templates are based on the templates accessible to your configured account and platform.
Select the template required for your communication.
For example:
property_listing_request(en)
Depending on the selected template, Libwana.net may display additional template fields.
Step 12: Complete Cloud API Template Data
WhatsApp templates can contain different components, such as:
Header
Body
If your selected template contains a media header, Libwana.net may ask you to provide the required media information.
For example, an IMAGE header may display:
Media URL (IMAGE)
Enter the appropriate media URL required by the selected template.
If a template contains variables or other dynamic information, complete the required template data displayed by the platform before sending.
Step 13: Send Your WhatsApp Message
Before sending, verify:
- Recipient or selected audience
- Schedule, if applicable
- Sending method
- WhatsApp Business Account
- Selected template
- Header/media information
- Template variables or other required data
Once everything is correct, click:
Send
Libwana.net will process the WhatsApp message through your selected WhatsApp Cloud API configuration.
WhatsApp Sending Methods Available in Libwana.net
The Messages → WhatsApp → Send Message page contains two sending approaches:
With Cloud API
This is the currently supported WhatsApp sending method.
Select:
Sending Method → Cloud API
Then select your connected WhatsApp Business Account and the required WhatsApp template.
Complete the required template information and send the message.
Without Cloud API
Libwana.net also includes a Without Cloud API option in the messaging interface.
This method is intended to work with WhatsApp Node Devices.
The interface can include Node Device selection methods such as:
Random Rotation and Automatic
However, Without Cloud API / WhatsApp Node Device messaging is not currently offered for user setup on Libwana.net.
This functionality is planned for the future.
Therefore, users should currently select Cloud API when sending WhatsApp messages.
Complete WhatsApp Cloud API Flow
The complete process can be summarized as:
Gateway → WhatsApp → WhatsApp Cloud API → Connect via Embedded Signup OR Add Manually → Configure Account → Configure Webhook → Manage/Synchronize Templates → Messages → WhatsApp → Send Message → Choose Audience → Select Cloud API → Select Business Account → Select Template → Complete Template Data → Send
With this setup, businesses can manage their WhatsApp communication from one centralized platform.
Conclusion
Libwana.net's WhatsApp Cloud API Gateway provides businesses with a convenient way to connect their WhatsApp Business Account and manage WhatsApp communication.
Users can connect through Meta Embedded Signup or use the preferred Add Manually method when they already have their WhatsApp Cloud API credentials.
Once configured, users can manage templates and webhooks and send WhatsApp messages from the Messages section using Single Audience, Group Audience, or Import File options.
Currently, Cloud API is the supported WhatsApp sending method. The Without Cloud API / WhatsApp Node Device method is planned for future availability.
Always ensure your WhatsApp communication follows applicable Meta/WhatsApp policies, template requirements, recipient consent requirements, and local messaging regulations.
Recent Blogs
 Mon, Sep 7, 2026 7:25 PM
How to Set Up an Email Gateway in Libwana.Net for Single & Bulk Email Sending
 Mon, Sep 7, 2026 7:31 PM
How to Set Up an SMS API Gateway and Send Bulk SMS